Monday 29 June 2015

Summer Fun Inspired Tag

Hello all,

Its blazing hot here in Chennai. In Chennai, we have a joke that this city enjoys 4 seasons through the year - warm, hot, hotter & hottest! Right now we are facing the hottest part of the year. So naturally, I wanted to make something that is summery and fun! And what better than water. The sheer thought of it feels cool, refreshing and vibrant.

For some reason I wanted to do a tag that could go well with a gift, card or a scrapbook. It has multi-utility.

So here is what I have created:


Did you guys notice the tiny sailor's knot that I have tied around the tag's jute.


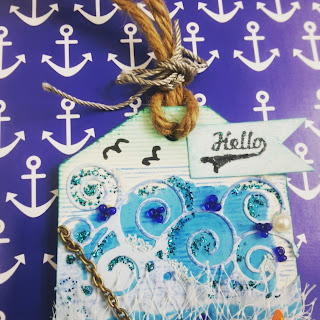
The stamps that I have used here were actually something that I picked up when I was 13! I managed to save them and I totally treasure them :D

I am also entering this for the following challenge:
http://www.lulupu.blogspot.in/2015/06/challenge-50-summer-splash-tutorial-to.html

Hope you guys like it!

You could hop over to my page to follow my regular work at:
www.Facebook.com/handcraftedbyesha

Toodles!

Friday 15 May 2015

Romantic Explosion Box

Hello,

I had been toying with an idea of making an explosion box for long until I got an opportunity to custom make one. So the theme was an anniversary box to celebrate 1000 days of married life. The brief was also to make it very romantic with adequate use of hearts!

So I did a double-layered, explosion box. The color palette I opted was black and red on the exteriors and light pink and cream on the inside. Here are a few pictures of the box:


I totally loved the black and red combination especially the chevrons. They add so much of glamour to this box. I think the red mulberry rose and the ribbon add in the perfect dash of romance. 


I handmade these red and pink roses, added in flourishes, a cute magenta bow, a key and a couple of other flowers for the box.


On the insides, I have done a 2 layer cake with 1000 written on it. Now there is no messaging like wishing 'Happy Anniversary' as the brief was to not mention anything and have only 1000 written on it so she can surprise her husband.


Off the 12 sides available, I have given 10 sides to hold pictures and an envelope on 1 side to hold a message and a quote on another side. Kept the page area clutter-free with essential embellishments to leave space to add in pictures.

I really loved the way the box turned out. Its simple, romantic and clean. I loved the colors. And its on my list again, only this time to make one for my husband :)

Let me know what you guys think about it!

Do check out my Facebook page for my other projects and updates here: www.Facebook.com/handcraftedbyesha


Monday 11 May 2015

An Altered Diary

I am a big stationery buff! Self-confessed! And I am also super lucky to have a friend who is equally crazy about stationery as I am. And diaries are one of our common favorites!

I think put together we must have gifted at least 10 dairies to each other on our birthdays or simply like that. So this year for her birthday, I decided to do up the cover page myself as I wanted to gift her something unique. Off late she has taken interest in sewing and fashion designing - hence I opted for a sewing-stitching theme.

And when I started working on it, I gave her a coordinating tag that she could use as a bookmark as well! (Oh yes! we share a common interest of collecting bookmarks as well :))

So here are the pictures of my customized diary along with a coordinating tag cum bookmark:


I bought a plain, single color pages diary. I used a cream net fabric to do up the cover after covering the cover with a paper from the sew-lovely paper pack from Craft Easy first. Then I plaited light blue, yellow and light green Anchor embroidery threads and stuck it near the spine of the book along with a pearl chain and an old lace that I found lying around in my house. I then embellished the diary with a distressed mannequin, thread spool (I wrapped up some light blue Anchor embroidery thread around the spool after distressing it a bit), sewing needle, wooden buttons, sewing machine, a small glass bottle filled with sequins, buttons, a mini-scissors, a mini-mirror and a handmade distressed, paper inch tape. Some of the embellishments such as mini-scissors, needle are from Jesse James - Dress it Up Embellishments - sewing room buttons. They are ultra cute and can be used to add that instant jazz on any layout.

Here is a close-up of the tag cum bookmark:


I cut-out alphabets from one of the papers from the sew-lovely paper pack from Craft Easy to add up a line: Sew glad we are friends". I embellished the tag with a lace, a few buttons, a handmade mini-distressed paper inch tape, a net bow, pearls, hooks, and a mini-embroidery thread spool that I made using Anchor embroidery thread. 

Here is the picture of the back of the book:


I kept the back simple, just covered it with a paper from the paper pack and continued the spine from front page till the back page.

I hope she likes it! I totally loved working on it, and had so much fun along. 

Let me know what you guys think about it :)

Do check out my Facebook page for my other projects and updates here: www.Facebook.com/handcraftedbyesha


Tuesday 5 May 2015

Baby Yearbook - Just Born

Hi there,

This being my very first post, I am super thrilled to share my projects with everyone. Crafting is such a fun way to keep yourself occupied. So many new tricks and techniques we learn while getting messy with glue and scissors. I have always had a special interest in making all things around me look pretty and attractive. To be honest, I can spend a whole day with just paper, glue, ribbons and scissors.

I always loved the idea of scrapbooking. Its such a fantastic thought to whoever has introduced this to the world! Keeping your keepsakes in such a wonderful fashion and such a refreshment of memories it is when you go through your scrapbooks.

The project that I want to showcase today is a baby book. I am very excited to share my first complete scrapbook. (I usually have the habit of buying a book with many pages, decorating the initial few pages and then leaving them adding in layouts as and when I wish.)

This is a unisex scrapbook that I made in a yellow-green theme. This could be used for a baby girl or boy. It has 5 pages in total with 12 sides including the inner sides of the cover. The size of the book is 8*9.5 inches. It comes with lots of space for adding in pictures and journaling notes. The book basically chronicles the first year of the baby's growth. It starts with a summary of the pregnancy and ends with the essential firsts of the baby.

And here are the pictures.


This is the cover page. please ignore the tacky font of my initials, I had a problem with my basic laptop utilities thereby disallowing me to watermark with my pretty logo :(

The cover is embellished with a mix of mdf, resin, wooden, metal charm and paper embellishments.


This is the first page with the inner cover page. As I mentioned this captures the essence of pregnancy. The envelope provided can be used to store pregnancy scans :)


This layout captures the first few moments of the baby's life. There is also provision to stamp in baby's hand and footprints.


So this is the first baby book that I have designed. You can also watch the video of the book here: 


I hope you all like it. Do leave in your comments and feedback.

Also do check out my Facebook page for further updates and projects here: www. Facebook.com/handcraftedbyesha

See you until my next project!