Thursday, 2 June 2016

PABD Blog Hop

Hello,

There is a blog hop happening at Peek-A-Boo-Designs. Their DT has some lovely projects lined up, so hop along and leave them some love.

You can check it out here:
https://peek-a-boodesigns.blogspot.in/2016/06/challenge-7-and-blog-hop.html


Also don't forget to spread the word!

Monday, 25 April 2016

Baby Girl Album - Butterflies and Florals

Hello,

I am so excited today to share with you the pictures of my latest baby girl album. It's done in a butterflies and floral theme and it took me nearly 3 weeks to complete it. It's very special to me because I really planned a lot of details in it and its a book of many firsts for me. Learning and having fun along the way, this is a 10 x 10 inches book. It has 25 journalling spaces along with a capacity to hold 120 plus pictures. The book was custom made to chronicle the first year of a baby's growth, development and milestones.


Have a look at the pictures here:


This is the cover page. Have used a digital stamp here and it also has the name of the little angle for whom the book was designed.  


The spine, off-late I have been loving to work with these beautiful rose laces.


                               The first page capturing the essence of pregnancy.


                         Going forward are few of the inside layouts from the book.


That's it from me on this post for now. Let me know what you think of it in the comments section below.

You can also stay updated with all my latest by following my Facebook page here:

Saturday, 23 April 2016

Stamping Fun!

Hi there,

I am back with a new and an exciting post on stamping and its techniques. 
Stamping is something that I have taken to a lot of liking off late and and in a very short span of time, I have accumulated 20 plus stamps and still have many more to strike off on my wishlist.

 For a long time now I had been hunting for a cute set of animal stamps as I wasn't very happy with what was available out there in the market. I wanted a pack of animal stamps which had an assortment of animals and not just the same animal in different angles. This is when I chanced upon the exclusive set of stamps for stamp club members only by Peek-a-Boo Designs. I quickly subscribed and got my hand on this ultra cute set - Cute Critters and Little wonder from their April release, fearing they would run out of stock soon :)

I was very excited about the Cute Critters set and I decided to use them in making some baby birth announcement projects. I zeroed on 2 projects to use these stamps - one was money holders and other a multi-purpose card which can be used as a tag / bookmark / journal card. Now lets take a look at these 2 projects in detail.

For the money holders, I used the technique of masking, where in I used the leaves from We R Memory Keepers stamps ( picked from Itsy Bitsy ) to create a strip of leaves along with tress, shrubs, snail and a ladybug from the Cute Critters set. I used this layer to mask the animals and stamp them behind. This creates an impression of leaves appearing in front and animals standing behind the leaves. This created a lovely background for my money envelopes. I used a mix of color pencils, crayons and sketches to color the animals and the background. I finished it off with butterflies from the Cute Critters set and an "It's a boy" sentiment from the Little wonder set. 
Here is the picture of the money holders.


For the multi-purpose card, I am going to show you a step-by-step tutorial. This card is so adorable and versatile that it can be used as a gift tag, bookmark, photo mat or as a journal card to pen down a few baby memories. This is how the card looks like.


To begin with, you need the following supplies:

  1. A couple of designer papers - I used a few papers from Papericious in yellow and orange keeping a jungle theme in mind.
  2. A white card stock for the background - I used something which has a wooden texture feel.
  3. Animal stamps - Cute Critters from PABD
  4. Baby sentiments - Little Wonder from PABD along with stamping accessories such as stamp block and ink pads.
  5. Color pencils / crayons / sketches for coloring
  6. Bakers twine in dark green
  7. Glue, scissors and double sided foam tape

Here are the steps to create this card:

1. Start with stamping animals, I used Memento tuxedo black for stamping them. I wanted to create a 3D look for the animal face, therefore I stamped 2 of each animals.


2. Next fussy cut them and color them. While fussy cutting the second set, I cut only the face of the animals leaving out the ears as I planned to give a pop-up feel to their face using double sided foam tape. For coloring I like to go lighter in center and darker on the sides and edges of the stamped image. 


3. Cut the base white card stock in the size 5.8 x 3.75 inches. The dimensions of the yellow paper are 1.75 x 3.75 inches and that of orange pattern sheet is 4 x 3.75 inches. Paste them on the white card stock as shown and round off the edges.


4. Post this, I used left over scrap paper to cut out flags and created a banner streamer using bakers twine. I stuck it where the yellow and orange paper meet. And then I stuck the animals above this streamer.

.

5. I then stuck the faces of the animals using double sided foam tape to create a 3D look.


6. Finally, finished it off by adding bows made with bakers twine in the streamer and a stamped sentiment "Little wonder" from the stamp set. I used distress ink in spiced marmalade for stamping the sentiment and distressing the card stock in mustard seeds.


So these were my 2 projects that I loved making using these animal stamps. they were so much fun and enjoyable to work with. There are so many ways in which these stamps can be used.


Do share your take on my projects in the comments below.

You can follow my Facebook page for regular updates of all my projects here:

I am also entering this for Peek-a-Boo-Designs blog challenge no 5 here:


Tuesday, 12 April 2016

Shadow Box Art - A wonderful birthday present

Hello Friends,

I am back again with a new post this time. Here I am showcasing a new shadow art box that I had custom made as a birthday present. I have used a whole of embellishments to deck up this box along with yummy papers from Papericious and DCWV. The compartments of the box are customized to suit the needs of the individuals such as their wish to visit 7 wonders of the world, love for family especially their son and a wish to own a dream home. It was also done in the favorite color of the person to whom it was being gifted, in this case it happens to be purple. 

So here are a few pictures of the project:


Let me know what you think of this project in the comments section below. You can also stay updated with all my latest work by following me on my Facebook page here:


I am also linking this project to Papericious's first challenge here:


Wednesday, 24 February 2016

Valentine's Special - Album in a box

Hi peeps,

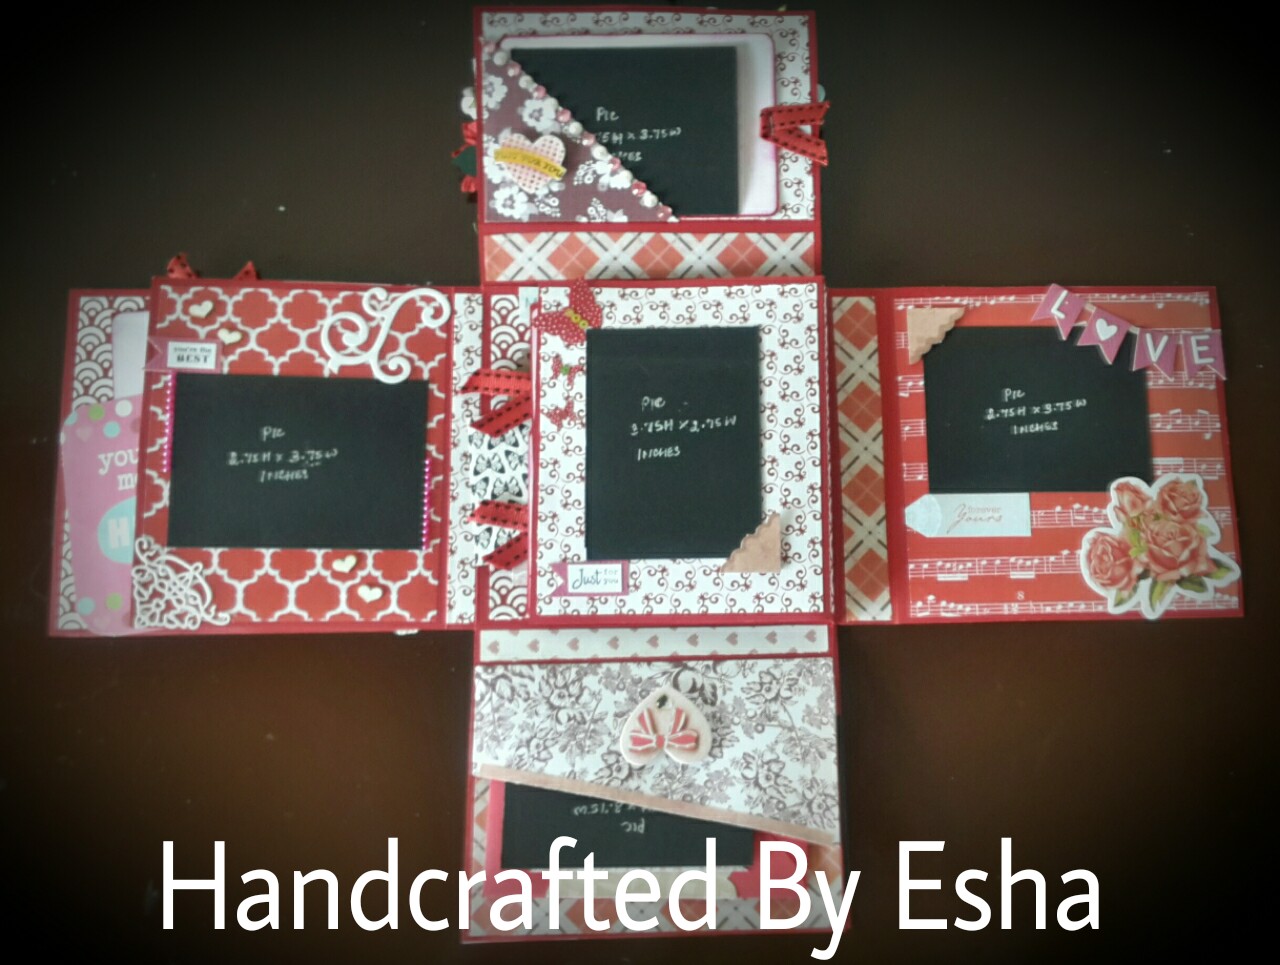
So I am back with a new project and this time I made this just in time for Valentine's Day.
The project that I am going to showcase today is an album in a box. A cute, little 6 x 6 x 1 inches box, enough to hold few pictures of your special memories and journal a few notes. The box has been designed keeping in mind the romantic theme with the obvious color palette of red, pink, magenta, black and white. It holds space for about 11 pictures, one envelope for a personal letter and 8 journalling cards. It's liberally decked up with heart shaped embellishments, flowers, romantic sentiments and charms.


So here are the pictures of the project:


A close-up view of the center space.

So hope you guys had a lovely valentines and liked this little album in a box. I am also submitting this as an entry in the Peek-a-boo Designs blog challenge for the month of February 2016, linking the blog link here:


(Used Column 1: flowers, twine/ribbon and red/pink)


Do let me know in the comments below about what you guys think of my album in a box.

See you until next post!


Monday, 29 June 2015

Summer Fun Inspired Tag

Hello all,

Its blazing hot here in Chennai. In Chennai, we have a joke that this city enjoys 4 seasons through the year - warm, hot, hotter & hottest! Right now we are facing the hottest part of the year. So naturally, I wanted to make something that is summery and fun! And what better than water. The sheer thought of it feels cool, refreshing and vibrant.

For some reason I wanted to do a tag that could go well with a gift, card or a scrapbook. It has multi-utility.

So here is what I have created:


Did you guys notice the tiny sailor's knot that I have tied around the tag's jute.


The stamps that I have used here were actually something that I picked up when I was 13! I managed to save them and I totally treasure them :D

I am also entering this for the following challenge:
http://www.lulupu.blogspot.in/2015/06/challenge-50-summer-splash-tutorial-to.html

Hope you guys like it!

You could hop over to my page to follow my regular work at:
www.Facebook.com/handcraftedbyesha

Toodles!

Friday, 15 May 2015

Romantic Explosion Box

Hello,

I had been toying with an idea of making an explosion box for long until I got an opportunity to custom make one. So the theme was an anniversary box to celebrate 1000 days of married life. The brief was also to make it very romantic with adequate use of hearts!

So I did a double-layered, explosion box. The color palette I opted was black and red on the exteriors and light pink and cream on the inside. Here are a few pictures of the box:


I totally loved the black and red combination especially the chevrons. They add so much of glamour to this box. I think the red mulberry rose and the ribbon add in the perfect dash of romance. 


I handmade these red and pink roses, added in flourishes, a cute magenta bow, a key and a couple of other flowers for the box.


On the insides, I have done a 2 layer cake with 1000 written on it. Now there is no messaging like wishing 'Happy Anniversary' as the brief was to not mention anything and have only 1000 written on it so she can surprise her husband.


Off the 12 sides available, I have given 10 sides to hold pictures and an envelope on 1 side to hold a message and a quote on another side. Kept the page area clutter-free with essential embellishments to leave space to add in pictures.

I really loved the way the box turned out. Its simple, romantic and clean. I loved the colors. And its on my list again, only this time to make one for my husband :)

Let me know what you guys think about it!

Do check out my Facebook page for my other projects and updates here: www.Facebook.com/handcraftedbyesha